Day trading can be an exceedingly fast and nerve-racking endeavor. It’s easy to miss a relatively big move if you’re not paying attention. And the pace gets even faster the smaller your time frame gets (e.g. tick, one-minute, or even five-minute charts).
But if you have the time and patience to sit in front of your screen for hours, why go for the small moves when you can catch the bigger ones? Remember what legendary trader Jesse Livermore once said, “It never was my thinking that made me the big money for me. It always was my sitting.”
Trading the 15-minute chart sits partway between a “day trading” and “swing trading” time frame. You may end up holding a trade, or even waiting for a trade, for anywhere between a few minutes to a few hours to an entire session. But this time frame also allows you to carefully assess and plan an intraday trade.
Your goal–whether you are a day trader, swing trader, position trader, or an investor–is to catch a big move.
How you might have positioned yourself for a big move in the ES this last month
One basic principle that is usually true (although not always) is that large moves tend to happen after periods of tight consolidation. Why is this the case? Tight consolidations are areas of very small constricted movements with small volume. They signify market indecision or anticipation (for news, an economic release, or some catalyst to push prices in one direction or another).
And when that catalyst finally occurs, the movement can be explosive. But it can also be followed by a small “correction” before continuing in its direction (sometimes it just keeps going).
Let’s take a look at what happened in the S&P on July 6, 2018.
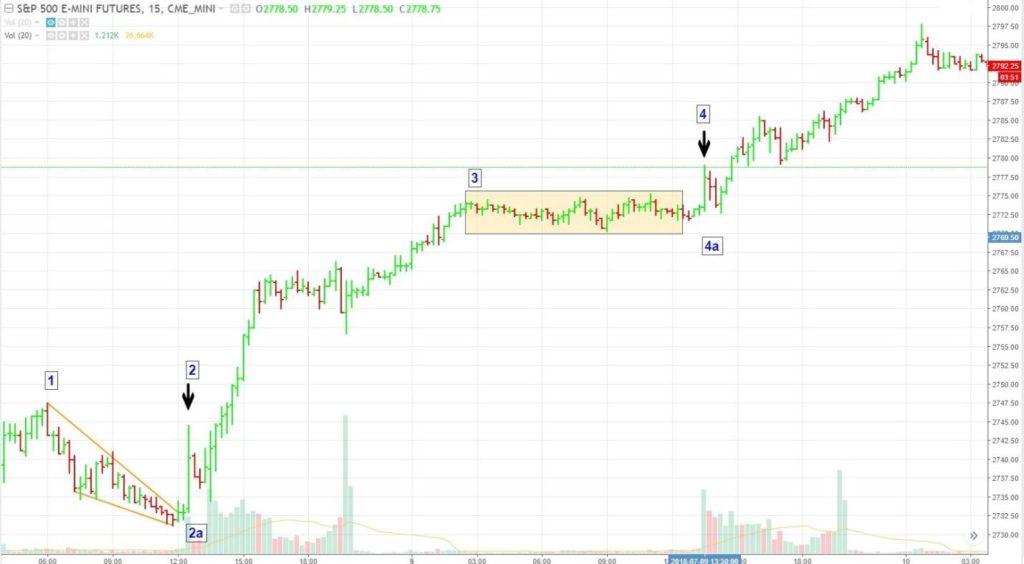
ESU2018 15-Minute Chart July 6 to July 10, 2018
Trade 1:
On the July 6 chart, we can see a classic “bullish pennant” forming at (1). Note that the range began shrinking in a manner typical of most pennants. Next, at (2) a “thrust bar,” characterized by its large range and high volume (2a), surged to the upside.
Thrust bars after periods of tight consolidation signal the possibility that a move is underway. In this case, the move after (2) continued for nearly three hours after the initial breakout.
How might have you potentially traded this? Entering at the close of the thrust bar and placing a stop loss at the bottom of the consolidation point (in this case the lowest point of the pennant) would have been favorable. Sometimes, thrust bars are followed by an opposite reaction, which in the case of (2) might have given you the opportunity to go long the ES at a lower price.
Trade 2:
The second potential trade on the chart was on July 9, 2018. We see an eight-hour period of tight consolidation at (3). This range is followed by a thrust bar at (4) accompanied by high volume at (4a).
Similar to Trade 1, we see two bars of selling, neither of which violated support at the bottom of the consolidation range. This last point is important, because had you entered the trade at the end of or following the thrust bar, you might have placed a stop loss (according to the rules we are suggesting) at the bottom of that range.
The upward momentum continued for nearly ten hours following the initial thrust, after which, momentum began to stall as price, once again, began to consolidate.
When a thrust bar doesn’t quite work out
Like every trading tactic, trading a thrust bar doesn’t always work out. This is why it is not only important to try to limit your loss by placing an appropriate stop, but it is important to size your positions to match what you may consider a reasonable percentage of loss.
Let’s take a look at another market: crude oil futures, starting on July 9, for comparison.
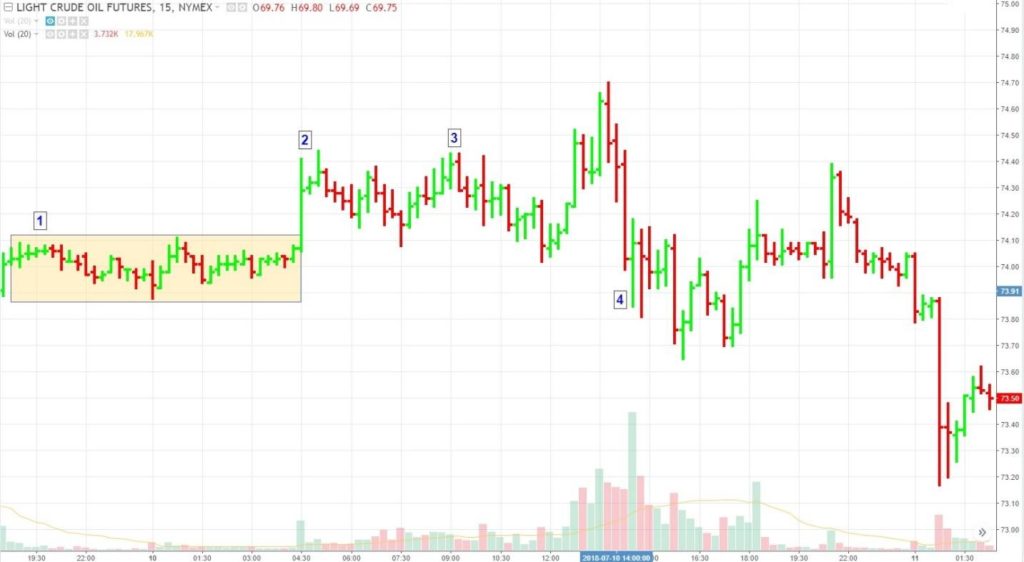
CLQ2018 15-minute chart July 9 to July 11, 2018
We identify a consolidation period at (1). This is followed by a thrust bar at (2). But then, pay attention to what happens next. Instead of moving upward from the direction of the breakout, it began consolidating again, but this time in a wider range (3).
At this point, the validity of the trade comes into question. You might even have considered exiting the trade, which would have been reasonable for the simple reason that the prices are not moving in the manner anticipated by the “model” (which is to move in the direction of the “thrust”).
Had you remained in the trade, you would have been stopped out at (4).
Remember that thrust bars are indications of a potentially large move. They are not surefire signals and they are not predictors. Just reasonable indications. So, trade wisely.
Risk Disclaimer: Hypothetical Performance Results Have Many Inherent Limitations, Some Of Which Are Described Below. No Representation Is Being Made That Any Account Will Or Is Likely To Achieve Profits Or Losses Similar To Those Shown. In Fact, There Are Frequently Sharp Differences Between Hypothetical Performance Results And The Actual Results Subsequently Achieved By Any Particular Trading Program.
One Of The Limitations Of Hypothetical Performance Results Is That They Are Generally Prepared With The Benefit Of Hindsight. In Addition, Hypothetical Trading Does Not Involve Financial Risk, And No Hypothetical Trading Record Can Completely Account For The Impact Of Financial Risk In Actual Trading. For Example, The Ability To Withstand Losses Or To Adhere To A Particular Trading Program In Spite Of Trading Losses Are Material Points Which Can Also Adversely Affect Actual Trading Results. There Are Numerous Other Factors Related To The Markets In General Or To The Implementation Of Any Specific Trading Program Which Cannot Be Fully Accounted For In The Preparation Of Hypothetical Performance Results And All Of Which Can Adversely Affect Actual Trading Results.
There is a substantial risk of loss in trading futures, options and forex. Past performance is not necessarily indicative of future results.